In Android, RelativeLayout let you position your component base on the nearby (relative or sibling) component’s position. It’s the most flexible layout, that allow you to position your component to display in anywhere you want (if you know how to “relative” it).
In RelativeLayout, you can use “above, below, left and right” to arrange the component position, for example, display a “button1” below “button2”, or display “button3” on right of the “button1”.
The
RelativeLayout is very flexible, but hard to master it. Suggest you use Eclipse IDE to drag the component, then view study the Eclipse generated XML layout code to understand how to code “relative” components.
In this tutorial, we show you how to arrange / position button, textview and editbox via “RelativeLayout“.
P.S This project is developed in Eclipse 3.7, and tested with Android 2.3.3.
1. RelativeLayout
Open “res/layout/main.xml” file, add components and position it via “RelativeLayout“. Read below XML code, quite verbose to tell you where to display the component.
File : res/layout/main.xml
<?xml version="1.0" encoding="utf-8"?>
<RelativeLayout xmlns:android="http://schemas.android.com/apk/res/android"
    android:layout_width="fill_parent"
    android:layout_height="fill_parent" >

    <Button
        android:id="@+id/btnButton1"
        android:layout_width="wrap_content"
        android:layout_height="wrap_content"
        android:text="Button 1"/>

    <Button
        android:id="@+id/btnButton2"
        android:layout_width="wrap_content"
        android:layout_height="wrap_content"
        android:text="Button 2"
        android:layout_toRightOf="@+id/btnButton1"/>

     <Button
        android:id="@+id/btnButton3"
        android:layout_width="wrap_content"
        android:layout_height="wrap_content"
        android:text="Button 3"
        android:layout_below="@+id/btnButton1"/>

     <TextView
         android:id="@+id/textView1"
         android:layout_width="wrap_content"
         android:layout_height="wrap_content"
         android:layout_below="@+id/btnButton3"
         android:layout_marginTop="94dp"
         android:text="User :"
         android:textAppearance="?android:attr/textAppearanceLarge" />

     <EditText
         android:id="@+id/editText1"
         android:layout_width="wrap_content"
         android:layout_height="wrap_content"
         android:layout_alignParentRight="true"
         android:layout_alignTop="@+id/textView1"
         android:layout_toRightOf="@+id/btnButton3" />

     <Button
         android:id="@+id/btnSubmit"
         android:layout_width="wrap_content"
         android:layout_height="wrap_content"
         android:layout_alignParentRight="true"
         android:layout_below="@+id/editText1"
         android:text="Submit" />

</RelativeLayout>
2. Demo
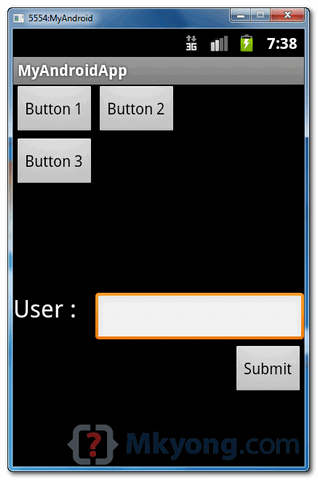
See result, above XML code will generate following output.

how i can do this by programing
test
thanks for this article. I am quite new to Android and tried to make a RelativeLayout too. Can anybody help me with that question: http://stackoverflow.com/questions/22306452/relativelayout-displays-incorrect-on-real-device
am unable to understanding yours nots
Please post android layout examples with java code
How can this be done dynamically
Really you’re Maallem
Hello,
This website is very useful for me. Thank you very much for your sharings.However ? have a problem with relative layout. i want to manage multiple radio button in multiple row in Android ,so it will work as group also.I tried relative and table layout in many ways. ?t cant run.How can I partition android radio button group into rows or columns without using different radio button groups.
it is very usefull for me
Thanks mr mkyong you are examples are very helpfull for biginer….
Hi all,
I am new to Android. I don’t know whether its possible. if yes, pls provide me some example. I have a button in main.xml. Is it possibile to access this button and add this button in others layouts?
Thanks in advance
Hi,
maybe you can help me with my little problem.
I designed this template on a Asus Tranformer Pad TF300T.
It works very well.
But when i test it on a smaller Device or for example on a Galaxy Nexus, it is real garbage.
So my Question: why the DP`s don`t scale?
<?xml version="1.0" encoding="utf-8"?>
<RelativeLayout xmlns:android="http://schemas.android.com/apk/res/android"
    android:id="@+id/outerContainer"
    android:layout_width="match_parent"
    android:layout_height="match_parent">
    <FrameLayout
        android:id="@+id/frameLowerMenu"
        android:layout_width="match_parent"
        android:layout_height="20dp"
        android:layout_below="@+id/frameContent"
        android:background="#ff29e1d8" />
    <FrameLayout
        android:id="@+id/frameNext"
        android:layout_width="100dp"
        android:layout_height="600dp"
        android:layout_toRightOf="@+id/frameContent"
        android:layout_below="@+id/frameUpperMenu"
        android:background="#ffd2c92b" />
    <FrameLayout
        android:id="@+id/frameContent"
        android:layout_width="1060dp"
        android:layout_height="600dp"
        android:layout_below="@+id/frameUpperMenu"
        android:layout_toRightOf="@+id/framePrevious"
        android:background="#ffc91db1" />
    <FrameLayout
        android:id="@+id/framePrevious"
        android:layout_width="100dp"
        android:layout_height="600dp"
        android:layout_below="@+id/frameContentState"
        android:background="#ffca983d" />
    <FrameLayout
        android:id="@+id/frameContentState"
        android:layout_width="150dp"
        android:layout_height="20dp"
        android:layout_toRightOf="@+id/frameUpperMenu"
        android:background="#ff29c14b" />
    <FrameLayout
        android:id="@+id/frameUpperMenu"
        android:layout_width="600dp"
        android:layout_height="20dp"
        android:background="#ffe32323" />
</RelativeLayout>
Kind Regards,
Pete
How do i run your example.zip in my computer. the package is package com.mkyong.android; it creates a problem.
And how you feed the RelativeLayout, and how you add items to it dinamically in code?
How is this “a tutorial”?
It just an XML file and a screen-shot. The same screen-shot everyone sees in Eclipse.
Nothing is explained or taught at all.
The XML file itself is pretty self-explanatory.
I agree with mr. mkyong there is nothing more to explain. Thanx for help 🙂