In Android, TableLayout let you arranges components in rows and columns, just like the standard table layout in HTML, <tr> and <td>.
In this tutorial, we show you how to use TableLayout to arrange button, textview and edittext in rows and columns format, and also demonstrates the use of “android:layout_span” to span view in 2 cells, and “android:layout_column” to display the view in specified column.
Note
In Eclipse 3.7, XML code assist will not prompts the attribute “
In Eclipse 3.7, XML code assist will not prompts the attribute “
android:layout_span“, “android:layout_column” and many other useful TableLayout attributes, no idea why, may be bug. Just put the attribute inside, it’s still compile and run.
P.S This project is developed in Eclipse 3.7, and tested with Android 2.3.3.
1. TableLayout
Open “res/layout/main.xml” file, add following views for demonstration. Read the XML comments, it should be self-explanatory.
File : res/layout/main.xml
<?xml version="1.0" encoding="utf-8"?>
<TableLayout xmlns:android="http://schemas.android.com/apk/res/android"
android:id="@+id/tableLayout1"
android:layout_width="fill_parent"
android:layout_height="fill_parent" >
<!-- 2 columns -->
<TableRow
android:id="@+id/tableRow1"
android:layout_width="wrap_content"
android:layout_height="wrap_content"
android:padding="5dip" >
<TextView
android:id="@+id/textView1"
android:text="Column 1"
android:textAppearance="?android:attr/textAppearanceLarge" />
<Button
android:id="@+id/button1"
android:text="Column 2" />
</TableRow>
<!-- edittext span 2 column -->
<TableRow
android:id="@+id/tableRow2"
android:layout_width="wrap_content"
android:layout_height="wrap_content"
android:padding="5dip" >
<EditText
android:id="@+id/editText1"
android:layout_span="2"
android:text="Column 1 & 2" />
</TableRow>
<!-- just draw a red line -->
<View
android:layout_height="2dip"
android:background="#FF0000" />
<!-- 3 columns -->
<TableRow
android:id="@+id/tableRow3"
android:layout_width="wrap_content"
android:layout_height="wrap_content"
android:padding="5dip" >
<TextView
android:id="@+id/textView2"
android:text="Column 1"
android:textAppearance="?android:attr/textAppearanceLarge" />
<Button
android:id="@+id/button2"
android:text="Column 2" />
<Button
android:id="@+id/button3"
android:text="Column 3" />
</TableRow>
<!-- display this button in 3rd column via layout_column(zero based) -->
<TableRow
android:id="@+id/tableRow4"
android:layout_width="wrap_content"
android:layout_height="wrap_content"
android:padding="5dip" >
<Button
android:id="@+id/button4"
android:layout_column="2"
android:text="Column 3" />
</TableRow>
<!-- display this button in 2nd column via layout_column(zero based) -->
<TableRow
android:id="@+id/tableRow5"
android:layout_width="wrap_content"
android:layout_height="wrap_content"
android:padding="5dip" >
<Button
android:id="@+id/button5"
android:layout_column="1"
android:text="Column 2" />
</TableRow>
</TableLayout>
2. Demo
See result.
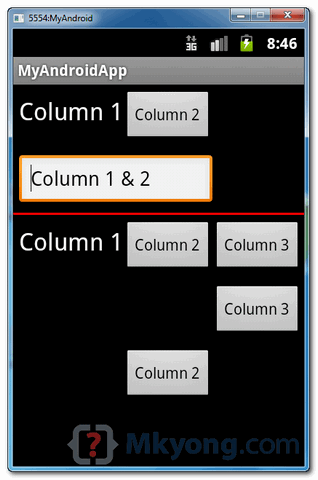
Download Source Code
Download it – Android-TableLayout-Example.zip (15 KB)

How to make row with only 2 textview but required 3 columns so either 1 or 3 column can be empty. ??
Nice tutorial
I am having 5 columns so how can i adjust in equal parts….
android:stretchColumns=”0,1,2,3,4″
Check out my blog. The following post includes a video
that shows you how to create an Android smartphone application that displays a
vertically scrolling list of countries on the screen. The application is
created using the Eclipse IDE and Android SDK. It features an “OK” button at
the bottom of the screen that, when pressed, terminates the application.
In the process of making this Android application you will
encounter the following SDK object types, etc: ScrollView, Button, View, TableLayout, TableRow, OnClickListener, TextView, and Colours in Android represented by hexadecimal numbers.
http://androidprogrammeringcorner.blogspot.com/2015/03/pak-longs-android-programming-corner.html
Best regards,
Philip
Thanks for the demo!
how to span a view in two rows
Try using linear layout.
as per the android specs the children of table layout should never be specified layout_width it is always taken to be match_parent
how to center the item of each row / column?
android:layout_gravity=”center” ?
is there anyway to click on each item in the table row? for example, I have 4 images in a table row and i want to click on each image to disply its name? so which event onclick i can use?
Been hitting a bunch of your post as I learn Android Dev. Great stuff, probably the best and easier to learn out there! Keep it up!
Este tipo de ejemplos ayudan muchísimo para los que apenas estamos aprendiendo. Thanks for the example.
It seems there is no direct property to do row span.
This website has information to do row span using table layout. May be this will help others.
http://www.compiletimeerror.com/2013/07/android-tablelayout-example.html
I have a question on this type of layout.
on a small phone, this is ok. However, when I try to do on a tablet for some sort of inventory infor input. I add a lot of fields and when I add android:textSize=”25sp” and android:layout_span to space between fields. The whole appearance get mess up. Do u know what kind of problem i am encounter? if need, i will send my XML thanks
when i used this table layout it works fine in the AVD but when i installed it on the phone it makes some resolution problems, ie it doesn’t matches with the screen size can you help me out in this
i guess that the prompts are more kind of an advise, you put “columns x” like text and it will be “better” if you put them as values at strings, i didn’t try to change it but i guess it’s just the advice, not a bug 🙂
Awesome, as always
great tutorial, thanks for your help
Hai. I am a starter in android application development. Kindly help me how to create multiple rows in a table and key performance to create a row. I am able to create 3 rows now. but i want to autogenerate the rows while entering the datas in table.
Thanks …
awosome tutorial …………………..
great tutorials … thanks …
thanks, this is very helpful. 🙂
thanks a lot
nice work
Very nice site! Just a quick language tip :-).
You might also like this tutorials : …
Should be:
You might also like THESE tutorials : …
Thanks for sharing! Your post is very useful to me!
Wish you best! 🙂
one more thing when ever design a screen first use scrollview layout and then add your layouts to it…….it makes your screen scrollable even you turn your mobile into landscape………………
Nice tips. Thanks ~
can you say how to add scrollview layout… thankyou
add scrollview open and close tab bothside of view
Hi,
Thanks for the tutorial. I have been struggling to learn how to reduce (or control) space between rows. I am trying to make my screen fit on different screen sizes (vertically),…I notice the space between table rows is pushing my widgets downscreen so they cannot be seen. What should I do? Thanks.
instead of using table layout go through the relative layout otherwise absolute layout
nice tutorial…this help me a lot….and i searching all over the google and at last i find urs tutorial .thnx…
what is the use of layout_span in edit text box..
It has made the edittext field equivalent to two columns,,,,