In this tutorial, we will demonstrates the use of TabLayout to render 4 tabs – “Android”, “Windows”, “Apple” and “BlackBerry”, each tab contains a textview to display a simple message.
P.S This project is developed in Eclipse 3.7, and tested with Android 2.3.3.
1. Tab Images
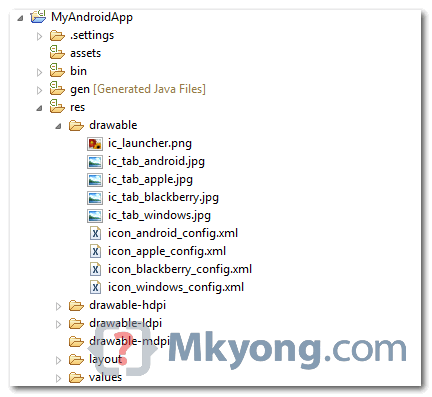
Put 4 tab images in “res/drawable” folder. The tab images used in this tutorial are not follow the Android icon guideline, sorry, i’m just not good at design :).
2. Tab Images in XML
Create 4 XM files to tell which image to use for each tab, and put it into the same “res/drawable” folder.
File : icon_android_config.xml
<?xml version="1.0" encoding="utf-8"?>
<selector xmlns:android="http://schemas.android.com/apk/res/android">
    <!-- When selected, you should use bg with grey -->
    <item android:drawable="@drawable/ic_tab_android"
          android:state_selected="true" />
    <!-- When not selected, you should use bg with white -->
    <item android:drawable="@drawable/ic_tab_android" />
</selector>
File : icon_apple_config.xml
<?xml version="1.0" encoding="utf-8"?>
<selector xmlns:android="http://schemas.android.com/apk/res/android">
    <!-- When selected -->
    <item android:drawable="@drawable/ic_tab_apple"
          android:state_selected="true" />
    <!-- When not selected -->
    <item android:drawable="@drawable/ic_tab_apple" />
</selector>
File : icon_blackberry_config.xml
<?xml version="1.0" encoding="utf-8"?>
<selector xmlns:android="http://schemas.android.com/apk/res/android">
    <!-- When selected -->
    <item android:drawable="@drawable/ic_tab_blackberry"
          android:state_selected="true" />
    <!-- When not selected -->
    <item android:drawable="@drawable/ic_tab_blackberry" />
</selector>
File : icon_windows_config.xml
<?xml version="1.0" encoding="utf-8"?>
<selector xmlns:android="http://schemas.android.com/apk/res/android">
    <!-- When selected -->
    <item android:drawable="@drawable/ic_tab_windows"
          android:state_selected="true" />
    <!-- When not selected -->
    <item android:drawable="@drawable/ic_tab_windows" />
</selector>
3. Tab Activity
Create 4 activitiy classes, and tell which activity to use for when tab is clicked. All 4 classes are doing the same thing, display a textview component.
File : AndroidActivity.java
package com.mkyong.android;

import android.app.Activity;
import android.os.Bundle;
import android.widget.TextView;

public class AndroidActivity extends Activity {
    public void onCreate(Bundle savedInstanceState) {
        super.onCreate(savedInstanceState);

        TextView textview = new TextView(this);
        textview.setText("This is Android tab");
        setContentView(textview);
    }
}
File : AppleActivity.java
package com.mkyong.android;

import android.app.Activity;
import android.os.Bundle;
import android.widget.TextView;

public class AppleActivity extends Activity {
    public void onCreate(Bundle savedInstanceState) {
        super.onCreate(savedInstanceState);

        TextView textview = new TextView(this);
        textview.setText("This is Apple tab");
        setContentView(textview);
    }
}
File : BlackBerryActivity.java
package com.mkyong.android;

import android.app.Activity;
import android.os.Bundle;
import android.widget.TextView;

public class BlackBerryActivity extends Activity {
    public void onCreate(Bundle savedInstanceState) {
        super.onCreate(savedInstanceState);

        TextView textview = new TextView(this);
        textview.setText("This is BlackBerry tab");
        setContentView(textview);
    }
}
File : WindowsActivity.java
package com.mkyong.android;

import android.app.Activity;
import android.os.Bundle;
import android.widget.TextView;

public class WindowsActivity extends Activity {
    public void onCreate(Bundle savedInstanceState) {
        super.onCreate(savedInstanceState);

        TextView textview = new TextView(this);
        textview.setText("This is Windows mobile tab");
        setContentView(textview);
    }
}
4. Main Activity
Create an entry point, link above 4 tab activity classes with TabHost, TabSpec and etc.
package com.mkyong.android;

import android.app.TabActivity;
import android.content.Intent;
import android.content.res.Resources;
import android.os.Bundle;
import android.widget.TabHost;
import android.widget.TabHost.TabSpec;

public class MainActivity extends TabActivity {

	public void onCreate(Bundle savedInstanceState) {
		super.onCreate(savedInstanceState);
		setContentView(R.layout.main);

		Resources ressources = getResources();
		TabHost tabHost = getTabHost();

		// Android tab
		Intent intentAndroid = new Intent().setClass(this, AndroidActivity.class);
		TabSpec tabSpecAndroid = tabHost
		  .newTabSpec("Android")
		  .setIndicator("", ressources.getDrawable(R.drawable.icon_android_config))
		  .setContent(intentAndroid);

		// Apple tab
		Intent intentApple = new Intent().setClass(this, AppleActivity.class);
		TabSpec tabSpecApple = tabHost
		  .newTabSpec("Apple")
		  .setIndicator("", ressources.getDrawable(R.drawable.icon_apple_config))
		  .setContent(intentApple);

		// Windows tab
		Intent intentWindows = new Intent().setClass(this, WindowsActivity.class);
		TabSpec tabSpecWindows = tabHost
		  .newTabSpec("Windows")
		  .setIndicator("", ressources.getDrawable(R.drawable.icon_windows_config))
		  .setContent(intentWindows);

		// Blackberry tab
		Intent intentBerry = new Intent().setClass(this, BlackBerryActivity.class);
		TabSpec tabSpecBerry = tabHost
		  .newTabSpec("Berry")
		  .setIndicator("", ressources.getDrawable(R.drawable.icon_blackberry_config))
		  .setContent(intentBerry);

		// add all tabs
		tabHost.addTab(tabSpecAndroid);
		tabHost.addTab(tabSpecApple);
		tabHost.addTab(tabSpecWindows);
		tabHost.addTab(tabSpecBerry);

		//set Windows tab as default (zero based)
		tabHost.setCurrentTab(2);
	}

}
5. Android Layout file
File : res/layout/main.xml
<?xml version="1.0" encoding="utf-8"?>
<TabHost xmlns:android="http://schemas.android.com/apk/res/android"
    android:id="@android:id/tabhost"
    android:layout_width="fill_parent"
    android:layout_height="fill_parent">
    <LinearLayout
        android:orientation="vertical"
        android:layout_width="fill_parent"
        android:layout_height="fill_parent"
        android:padding="5dp">
        <TabWidget
            android:id="@android:id/tabs"
            android:layout_width="fill_parent"
            android:layout_height="wrap_content" />
        <FrameLayout
            android:id="@android:id/tabcontent"
            android:layout_width="fill_parent"
            android:layout_height="fill_parent"
            android:padding="5dp" />
    </LinearLayout>
</TabHost>
6. Android Manifest
At last, put everything in “AndroidManifest.xml“, defined 4 tab activity classes and set the “MainActivity” as entry point.
File : AndroidManifest.xml
<?xml version="1.0" encoding="utf-8"?>
<manifest xmlns:android="http://schemas.android.com/apk/res/android"
    package="com.mkyong.android"
    android:versionCode="1"
    android:versionName="1.0" >

    <uses-sdk android:minSdkVersion="10" />

    <application
        android:icon="@drawable/ic_launcher"
        android:label="@string/app_name" >

        <activity android:name=".AndroidActivity" />
        <activity android:name=".WindowsActivity" />
        <activity android:name=".AppleActivity" />
        <activity android:name=".BlackBerryActivity" />

        <activity
            android:label="@string/app_name"
            android:name=".MainActivity"
            android:theme="@android:style/Theme.NoTitleBar" >
            <intent-filter >
                <action android:name="android.intent.action.MAIN" />
                <category android:name="android.intent.category.LAUNCHER" />
            </intent-filter>
        </activity>
    </application>

</manifest>
7. Demo
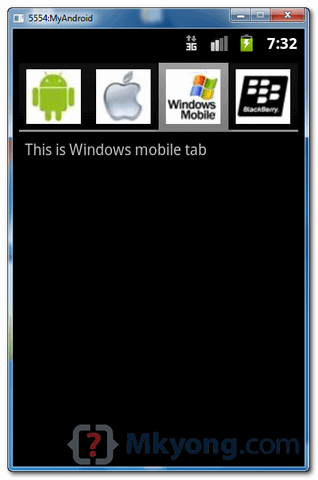
By default, Windows tab is selected.
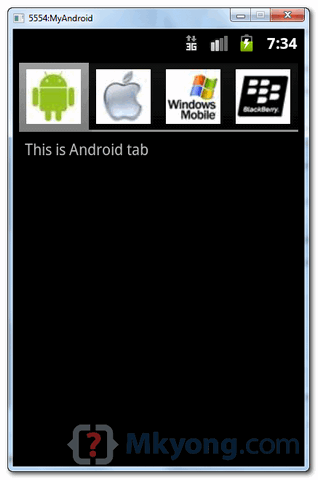
Click on the Android tab.

how do I get rid of the spaces in the drop down menus in the new new Firefox version(89)
Thanks sir. You saved me from all night issues without a solution.
Is it possible to work with an activity in each of the fragment under tabs? Because i have problem to work with activity in fragment (in tabs)..
on tab clicking my text is not changing can u please help me
when its not working with Android Lollipop what are the alternates?
Thanks !!
Doesn’t work with android lollipop….
It was great thank you. keep up the Good work.
Awesome!
I’m Indonesian
Terimakasih, Semoga Amal Ibadah kamu berkah
not able to run application even after following all your steps
thanks a lot my friends, . . .
this is really help me,…
😀
Thanks buddy… Your tutorials are neat and simple..
How to make the menu vertical??
Thanks for the tutorial. Is there any open source license associated with the use of source code for TabLayout or is the sample source public domain?
Regards,
Ali
what mein of it ?xml version=”1.0″ encoding=”utf-8″?>
and this is how set in android pletform
can u plz show an example 4 tab layout using text as tab instead of images? or you can suggest modifications on the current example?
Hello,
I’m one of your fans to love your blogs on Android tutorials. In this blog I learnt about TabLayout.
In the example I’m working on, I’m using ActionBarSherlock. Since .setIndicator() is not available while extending SherlockFragmentActivity, could you please help me on this with an alternative?
I’m also trying to add icons to the tabs created.
For a newbie, one of the most COMPLETE and concise “how-to” on this topic I’ve found. Thanks!
hi,i m beginer of android.how to create one activity instead of another activity? pls help to make it.
Hai,Iam a beginner in android . your apps is so good.
How do you add buttons and Other activities to each specific tab?
please tell me sir.
Thanks………………
hi but could u tell me how u had taken those res/drawable images how u had taken could u xpplain i’m new to android plz tell me how its possible
How do you add buttons and activities to each specific tab? For some reason it won’t work. Thanks
Nice tutorial
Go ahead
10x a lot your posts are always good for me. Ones agin 10x and keep good work…
Thx you so much !
thanks dear…
Hi I’m new to android and I came across your post I implemented my tab the same way and got it to work. Now I’m trying to just add one button to one of the Tabs…lets say for example for your android tab you add a greetings button that says Hello! when you click on it. I’ve tried everything but I can’t get it to work any help would be appreciated. Thanks!
Its gr8………..Its working..
I needed this code for my project…
Really Thanx!!!!!
Hai while am trying to run this program.. The main activity unfortunately it has stopped..
But in Program there is no error.. and when extend TabActivity it tab activity is deprecation… Plz tell me the solution for this
Yeah,, great it work on me,, thanks a lot.. 😀
Hello, I am a newcomer for writing android apps.
it works when I made
then, it wouldn’t work when I change to imageview, do you have any suggestions to fix that?
mTabHost.addTab (mTabHost.newTabSpec("Tab_test1").setIndicator("Tab1").setContent(R.id.imageView1)); mTabHost.addTab (mTabHost.newTabSpec("Tab_test2").setIndicator("Tab2").setContent(R.id.imageView2)); mTabHost.addTab (mTabHost.newTabSpec("Tab_test3").setIndicator("Tab3").setContent(R.id.imageView3));I have tried to implement this but cannot seem toi get a reference to the tabhost object
What do i do here to get hold of the tabhost object?
The following line produces an error:
TabActivity has the function getTabHost(), not Activity and TabActivity has been now deprecated. see : http://developer.android.com/reference/android/app/TabActivity.html