In Android, you can use “android.widget.RatingBar” to display rating bar component in stars icon. The user is able to touch, drag or click on the stars to set the rating value easily.
In this tutorial, we show you how to use XML to display a rating bar, few textviews and a button. When user click on the rating bar’s star, the selected rating value will be displayed in the textview. And, if user clicks on the button, the selected rating value will be displayed as a floating message (toast message).
P.S This project is developed in Eclipse 3.7, and tested with Android 2.3.3.
1. Rating Bar
Open “res/layout/main.xml” file, add a rating bar component, few textviews and a button.
The rating bar contains many configurable values. In this case, the rating bar contains 4 stars, each increase 1.0 value, so, it contains the minimum of 1.0 (1 star) and maximum value of 4.0 (4 stars). In addition, it made the 2nd star (2.0) selected by default.
File : res/layout/main.xml
<?xml version="1.0" encoding="utf-8"?>
<?xml version="1.0" encoding="utf-8"?>
<LinearLayout xmlns:android="http://schemas.android.com/apk/res/android"
    android:layout_width="fill_parent"
    android:layout_height="fill_parent"
    android:orientation="vertical" >

    <TextView
        android:id="@+id/lblRateMe"
        android:layout_width="wrap_content"
        android:layout_height="wrap_content"
        android:text="Rate Me"
        android:textAppearance="?android:attr/textAppearanceMedium" />

    <RatingBar
        android:id="@+id/ratingBar"
        android:layout_width="wrap_content"
        android:layout_height="wrap_content"
        android:numStars="4"
        android:stepSize="1.0"
        android:rating="2.0" />

    <Button
        android:id="@+id/btnSubmit"
        android:layout_width="wrap_content"
        android:layout_height="wrap_content"
        android:text="Submit" />

    <LinearLayout
        android:id="@+id/linearLayout1"
        android:layout_width="match_parent"
        android:layout_height="wrap_content" >

        <TextView
            android:id="@+id/lblResult"
            android:layout_width="wrap_content"
            android:layout_height="wrap_content"
            android:text="Result : "
            android:textAppearance="?android:attr/textAppearanceLarge" />

        <TextView
            android:id="@+id/txtRatingValue"
            android:layout_width="wrap_content"
            android:layout_height="wrap_content"
            android:text=""
            android:textAppearance="?android:attr/textAppearanceSmall" />

    </LinearLayout>

</LinearLayout>
2. Code Code
Inside activity “onCreate()” method, attach a listener on rating bar, fire when rating value is changed. Another listener on button, fire when button is clicked. Read the code’s comment, it should be self-explanatory.
File : MyAndroidAppActivity.java
package com.mkyong.android;

import android.app.Activity;
import android.os.Bundle;
import android.view.View;
import android.view.View.OnClickListener;
import android.widget.Button;
import android.widget.RatingBar;
import android.widget.RatingBar.OnRatingBarChangeListener;
import android.widget.TextView;
import android.widget.Toast;

public class MyAndroidAppActivity extends Activity {

  private RatingBar ratingBar;
  private TextView txtRatingValue;
  private Button btnSubmit;

  @Override
  public void onCreate(Bundle savedInstanceState) {
	super.onCreate(savedInstanceState);
	setContentView(R.layout.main);

	addListenerOnRatingBar();
	addListenerOnButton();

  }

  public void addListenerOnRatingBar() {

	ratingBar = (RatingBar) findViewById(R.id.ratingBar);
	txtRatingValue = (TextView) findViewById(R.id.txtRatingValue);

	//if rating value is changed,
	//display the current rating value in the result (textview) automatically
	ratingBar.setOnRatingBarChangeListener(new OnRatingBarChangeListener() {
		public void onRatingChanged(RatingBar ratingBar, float rating,
			boolean fromUser) {

			txtRatingValue.setText(String.valueOf(rating));

		}
	});
  }

  public void addListenerOnButton() {

	ratingBar = (RatingBar) findViewById(R.id.ratingBar);
	btnSubmit = (Button) findViewById(R.id.btnSubmit);

	//if click on me, then display the current rating value.
	btnSubmit.setOnClickListener(new OnClickListener() {

		@Override
		public void onClick(View v) {

			Toast.makeText(MyAndroidAppActivity.this,
				String.valueOf(ratingBar.getRating()),
					Toast.LENGTH_SHORT).show();

		}

	});

  }
}
3. Demo
Run the application.
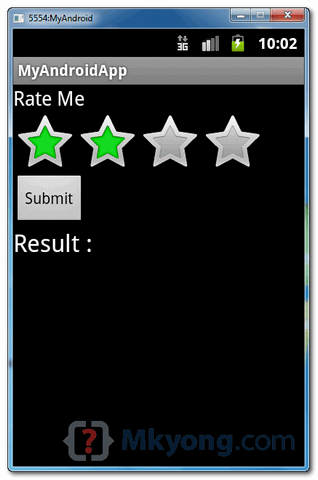
1. Result, 2nd star is selected by default.
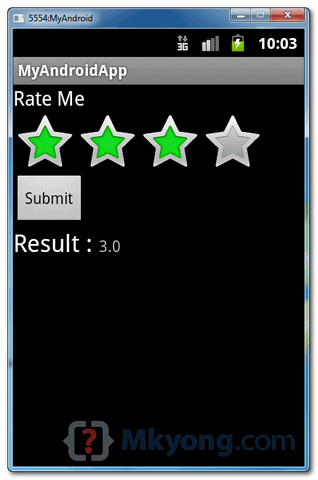
2. Touch on the 3rd star, rating value is changed, display the current selected value in the result (textview).
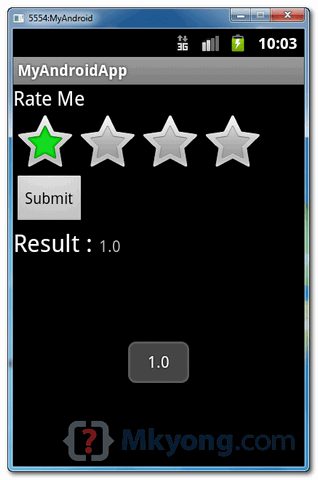
3. Touch on the 1st star, and click on the submit button, the current selected value is displayed as floating message.

Hello, when i click the Second Star in Rating Bar Third Star also painted . How can i solved this?
nice work
simple and clear, thank you so much for your time on explaining this matter, cheers!
Hi! is very succesful. But i dont know how save the rate in database. Can you help me? thanks!
did u get your answer plzzzz tell me. I have same issue.
Heyy! That’s amazing!!!
Thanks for your code :))))
Hi yet offically Android 2.3.3 is not launch how you Developed this app on Android 2.3.3 😀
how to store the reviews in mysql database please help me
great job
Thanks! This was very helpful
Debug for toast?
Button buttonOne = (Button) findViewById(R.id.button1);
buttonOne.setOnClickListener(new Button.OnClickListener() {
public void onClick(View v) {
//Do stuff here
}
});
In Android Rating help for ranting bars in android app’s
I got the error like Shader “‘android.graphics.BitmapShader’ is not supported in the Layout Editor” when i used the rating bar…
can u provide solution for it..
Could you kindly upload the local data storage(database)as well?
Thanks.
I do not even understand how I stopped up here, however I
believed this publish was good. I do not understand who you are but definitely you’re going to a well-known blogger in case you are not already. Cheers!
not at all good
package com.vishi.sendmessage;
import android.R.string;
import android.os.Bundle;
import android.app.Activity;
import android.content.Intent;
import android.view.Menu;
import android.view.MenuItem;
import android.view.View;
import android.widget.Button;
import android.widget.EditText;
import android.widget.RatingBar;
import android.support.v4.app.NavUtils;
import android.view.View.OnClickListener;
import android.widget.RatingBar.OnRatingBarChangeListener;
public class Sm extends Activity {
@Override
public void onCreate(Bundle savedInstanceState) {
super.onCreate(savedInstanceState);
setContentView(R.layout.activity_sm);
String st = null;
RatingBar rb=(RatingBar) findViewById(R.id.ratingBar1);
rb.setOnRatingBarChangeListener(new OnRatingBarChangeListener() {
public void onRatingChanged(RatingBar ratingBar, float rating,
boolean fromUser) {
final String str =String.valueOf(rating);
final EditText et = (EditText)findViewById(R.id.editText1);
Button b = (Button) findViewById(R.id.button1);
b.setOnClickListener(new OnClickListener() {
public void onClick(View arg0) {
// TODO Auto-generated method stub
Intent intent = new Intent(Sm.this,Second.class);
intent.putExtra(“sm”, (et.getText().toString())+” rating is “+str);
startActivity(intent);
}
});
}
});
}
@Override
public boolean onCreateOptionsMenu(Menu menu) {
getMenuInflater().inflate(R.menu.activity_sm, menu);
return true;
}
}
In android 4.0.3 there is one change in RatingBar. One have to add attribute
so that if user clicks on RatingBar the star will selected and vice-versa.
For e.g.
<RatingBar android:id="@+id/ratingBar1" style="?android:attr/ratingBarStyleMedium" android:layout_width="wrap_content" android:layout_height="wrap_content" android:isIndicator="false" />Thank you. This is the answer that I was searching for 2 days.
I was also asking why doesn’t work until I read your answer. Thank you soni!
Hi, thanks for the article. I have one small correction. RatingBars have a minimum of 0, and I don’t think there’s a simple xml setting to change that. You can see it by tapping on the stars and sliding your finger to the left. If you want to make 1 your effective minimum, you can add a OnRatingBarChangedListener and set it back to 1 if it becomes 0 (or disable your submit button, if applicable). Even that isn’t foolproof; you can slide to 0 and then click your submit button with another finger before letting go of the star widget, and a 0 will still slip through (assuming your device suppots multi-touch), so you should do validation before accepting the input as well.