In Android, you can use “android.widget.ImageView” class to display an image file. Image file is easy to use but hard to master, because of the various screen and dpi in Android devices.
Please refer to this official Android’s “Drawable Resource” and “Screen Support” article for better understand of how image works in Android.
In this tutorial, we didn’t go in deep about dpi and various screen issue, we just use ImageView to display a “png” image, when user click on a button, it will change to another “png” image.
P.S This project is developed in Eclipse 3.7, and tested with Android 2.3.3.
1. Add Image to Resources
Put your images into folder “res/drawable-ldpi“, “res/drawable-mdpi” or “res/drawable-hdpi“.
See figure below, no matter which folder you put, Android will find your image automatically. In this case, both “android.png” and “android3d.png” images are used for demonstration.
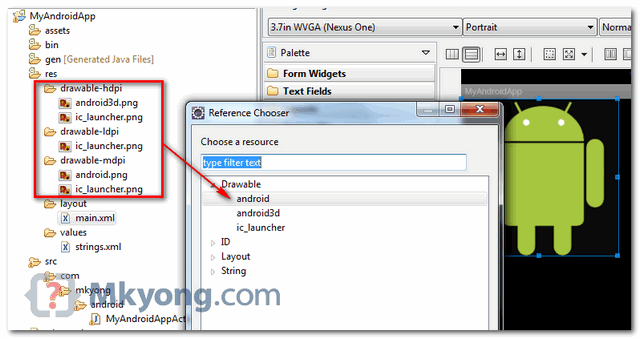
Again, read official Android’s “Drawable Resource” and “Screen Support” article to understand what is dpi and resources in Android.
2. Add ImageView
Open “res/layout/main.xml” file, just add an ImageView and Button for demonstration. By default, imageView1 will display “android.png”.
File : res/layout/main.xml
<?xml version="1.0" encoding="utf-8"?>
<LinearLayout xmlns:android="http://schemas.android.com/apk/res/android"
    android:layout_width="fill_parent"
    android:layout_height="fill_parent"
    android:orientation="vertical" >

    <ImageView
        android:id="@+id/imageView1"
        android:layout_width="wrap_content"
        android:layout_height="wrap_content"
        android:src="@drawable/android" />

    <Button
        android:id="@+id/btnChangeImage"
        android:layout_width="wrap_content"
        android:layout_height="wrap_content"
        android:text="Change Image" />

</LinearLayout>
3. Code Code
Simple, when button is clicked, change it to “android3d.png”.
File : MyAndroidAppActivity.java
package com.mkyong.android;

import android.app.Activity;
import android.os.Bundle;
import android.widget.Button;
import android.widget.ImageView;
import android.view.View;
import android.view.View.OnClickListener;

public class MyAndroidAppActivity extends Activity {

	Button button;
	ImageView image;

	@Override
	public void onCreate(Bundle savedInstanceState) {
		super.onCreate(savedInstanceState);
		setContentView(R.layout.main);

		addListenerOnButton();

	}

	public void addListenerOnButton() {

		image = (ImageView) findViewById(R.id.imageView1);

		button = (Button) findViewById(R.id.btnChangeImage);
		button.setOnClickListener(new OnClickListener() {

			@Override
			public void onClick(View arg0) {
				image.setImageResource(R.drawable.android3d);
			}

		});

	}

}
4. Demo
Run the application.
1. Result, “android.png” is displayed.
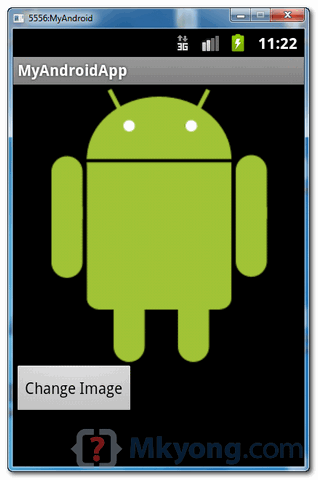
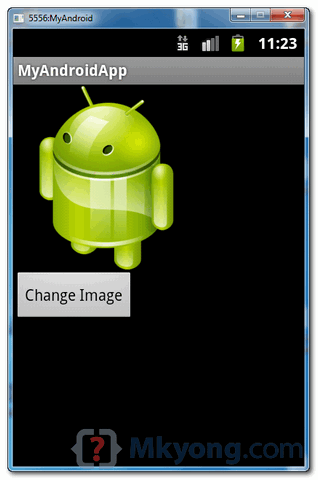
2. Click on the button, image will changed to “android3d.png”.

Very Good Example
How do i get name of picture? Thanks!
could someone help me with a tutorial that teaches the addition of a photo in the SQLite database from a registration form. thank you in advance
how to ensure that when I click ChangeImage upload from my storage. memory card or camera?
not working huh…..
package com.example.thoughoftheday;
import java.io.FileNotFoundException;
import java.io.InputStream;
import java.util.Calendar;
import android.app.Activity;
import android.content.Intent;
import android.graphics.Bitmap;
import android.graphics.BitmapFactory;
import android.net.Uri;
import android.os.Bundle;
import android.provider.CalendarContract.Calendars;
import android.widget.AnalogClock;
import android.widget.ImageView;
import android.widget.TextView;
public class MainActivity extends Activity {
public AnalogClock A;
public TextView a, b, c;
public ImageView imageView;
// private final int SELECT_PHOTO = 1;
// private ImageView imageView;
public Calendar cal;
public String[] arr_month = { “Jan”, “Feb”, “Mar”, “Apr”, “May”, “Jun”,
“Jul”, “Aug”, “Sep”, “Oct”, “Nov”, “Dec” };
public int[] images = {R.drawable.dow,R.drawable.th};
public void onCreate(Bundle savedInstanceState) {
super.onCreate(savedInstanceState);
setContentView(R.layout.activity_main);
cal = Calendar.getInstance();
// imageView = (ImageView) findViewById(R.id.imageView);
a = (TextView) findViewById(R.id.date);
b = (TextView) findViewById(R.id.month);
c = (TextView) findViewById(R.id.year);
imageView = (ImageView) findViewById(R.id.thought);
a.setText(“” + cal.get(Calendar.DATE));
b.setText(arr_month[cal.get(Calendar.MONTH)]);
c.setText(“” + cal.get(Calendar.YEAR));
imageView.setImageBitmap(images[cal.get(Calendar.DAY_OF_YEAR)]);
how an imageview can be fallen when clicked a button ?
pls anyone can help me?
Thanks. Simple and easy. I miss an example like yours in developer.android.com concerning the imageView.
You are Awesome
thanks mkyong, that was helpful and straight to the point
package com.example.myandroidview;
import android.os.Bundle;
import android.app.Activity;
import android.view.View;
import android.widget.ImageView;
import android.view.View.OnClickListener;
public class MyAndroidAppActivity extends Activity {
ImageView imageview;
@Override
protected void onCreate(Bundle savedInstanceState) {
super.onCreate(savedInstanceState);
setContentView(R.layout.activity_my_android_app);
addListenerOnButton();
}
public void addListenerOnButton() {
imageview =(ImageView) findViewById(R.id.imageView1);******
Here I am getting error.imageView1 field cannot be resolved or a field. Please help me.
****
}
My R.Java file it is declared.
public static final class string {
public static final int action_settings=0x7f050001;
public static final int app_name=0x7f050000;
public static final int hello_world=0x7f050002;
public static final int imageView1=0x7f050003;
public static final int btnChangeImage=0x7f050004;
}
My string.xml file
Myandroidview
Settings
Hello world!
Image
Next
}
Good & Simply.
Thank You very much.
I dont have any imageview in my XML file .. and i wan to add an image through coding in my java file .. i am doing this
ImageView iv=new ImageView(this);
iv.setImageResource(R.drawable.anyimage);
iv.setX(1);
iv.setY(1);
it is not working … no image is appearing on my screen .. please help me out with this one ???
I dont have any imageview in my XML file .. and i wan to add an image through coding in my java file .. i am doing this
ImageView iv=new ImageView(this);
iv.setImageResource(R.drawable.anyimage);
iv.setX(1);
iv.setY(1);
it is not working … no image is appearing on my screen .. please help me out with this one ???
Sir, Is it possible to insert the whole ImageView mannually ? By java file ?
How ?
what if i want the image to change automatically after a second or so
nice example , easy to accept this concept.
Thanks… I’d erase de line ”android:src=”@drawable/android” in the XML file. You gave the address after in the java code ‘image.setImageResource(R.drawable.pic_in_drawable_folder)’.
Thanks
Great tutorial! One note you may have to cntrl click the folder you just added you images to and refresh it to get the images to show up!
Help me recover the error
package com.rupinderjeet.GothGirls;
import android.app.Activity;
import android.os.Bundle;
import android.widget.Button;
import android.widget.ImageView;
import android.view.View;
import android.view.View.OnClickListener;
public class MainActivity extends Activity
{
Button button;
ImageView image;
/** Called when the activity is first created. */
@Override
public void onCreate(Bundle savedInstanceState)
{
super.onCreate(savedInstanceState);
setContentView(R.layout.main);
addListenerOnButton();
}
public void addListenerOnButton()
{
; image = (ImageView)findViewById(R.id.imageView1); button = (Button)findViewById(R.id.nextImage); button.setOnClickListener(new OnClickListener() { @Override public void OnClick(View v) { image.setImageResource(R.drawable.ic_launcher); } }); }}
thank you….. this is very helpful for me……
Perfect Example – had to mess about with Java compatibility though. See –
http://stackoverflow.com/questions/7637144/android-requires-compiler-compliance-level-5-0-or-6-0-found-1-7-instead-plea
I also re pasted code in from the web site ( was using the downloaded example ) to trigger a recompile
nice and simple
thank you sir.
This is great and I understand it. But the line
breaks it. I get “R cannot be resolved or is not a field”. There is no mention of the button in R.java
Can anybody help?
Thanks
OK it runs with the downloaded version, but can’t for the life of me work out what was wrong. I did have to delete @override in this
@Override public void onClick(View arg0) {Thank you , sir , it’s really basic but also useful.
thanxx
thank you sir………….
Awesome:):) Your way of explanation is very nice…
This is what i was looking for..thanks!
in this line image.setImageResource(R.drawable.android3d); i have received nullpointer exception .. pls any one help me
tu khud ek exception wo bhi nullpointer
thanks! 🙂
Pol
This is what i was looking for..thanks
Hi, great tutorial, but tell me please what are parameters of emulator. When im trying to run it, i get everytime exception with one action “force close”
you have error in code thats way its emulator gives you force close message.
Thank you 🙂 . Nice tutorial for image View
if you want the images to change repeatedly , then ???
thank you so much a solution that worked for me
A nice tutorial for Android ImageView.